Josh Wardell’s MINI Cooper S

May 18, 2006

Removing Rusted-On Wheels

Filed under: — Josh Wardell @ 11:27 pm

With the first break of our weeks of rain on Wednesday, I attempted to switch my snow tires off and mount my summer wheels. With a $20 2-ton trolley jack this process usually only takes me an hour. Of course nothing ever goes easy for me. It’s common that after a winter of snow and salt, the rims are a little rusted on, and usually need a good kick to come off. But for the best of me, I could not get 3 out of the 4 wheels to budge. I even loosened the bolts to finger-tight and drove around the block, cornering and braking. These suckers were good as welded. I gave up after several hours wasted, but at the end of the night I drove over to Home Depot and bought the newest tool for my car: an 8-pound long-handled sledge hammer!

After a late day of work Thursday, I ventured out at 9pm with my ever-useful LED headlamp flashlight to make another attempt. To make a long story short, I was still at it till 11pm when I finally got that last wheel free. But I had to try several times over and combine several techniques. Here’s what I had to do, in case it happens to you too:

-Squirt WD-40 in the seam between the rim and the hub, give some time for it to penetrate.
-While on the ground, loosen the bolts a turn.
-Jack up the car.
-Loosen the bolts so they are about a quarter inch away from the rim.
-Place a board of wood (I had none so instead used a 1-inch thick phone book) on the ground at the bottom of the tire.
-Hit the wood/phone book with the sledge, centered at the edge of the rim (not just hitting the tire).
-Try kicking the wheel at 3, 9, and 12 o’clock.
-If the wheel doesn’t budge, repeat a few times, re-spray with WD-40, drop the car, and move on to the other wheels.
-When you have tried once on all the wheels, drop the car and move it so the wheels have turned half way.
-Repeat all steps again as needed.

Once the wheel budges a little, even if it does not pop off, you can now squirt more WD-40 behind the gap, and kick around the circumference to loosen it, then one more hit with the sledge should free it. I should also say to only hit with the sledge medium-hard, you don’t want to screw up your alignment!

Once the wheel is off, I scrubbed the face of the hub and rim with steel wool and WD-40, as well as the inner hub. Ideally, applying a layer of anti-sieze compound before mounting the next wheel would also be a good idea.

I also took the opportunity to replace the stock bolts with lugs and studs with a Lug Nut Conversion Kit from PiloRacing. I used the shortest length and chrome open type lugs so they would still fit under the center caps of my X-lites. I also used LockTite Threadlocker Blue on the inner threads of the studs so they stay put. These not only look much nicer than the stock bolts, but make future changes much easier as you don’t have to line the wheels up perfectly and insert bolts while holding up the wheel.

May 8, 2006

One Lap of America

Filed under: — Josh Wardell @ 8:23 am

Two of our local MINI friends, Joe Rose and David Thibodeau are competing in this year’s One Lap of America. If you remember the old cross-country Cannonball Run from Brock Yates and Car and Driver magazine, this is the current version of that race. Instead of simply racing along public roads as fast as possible, it involves track racing and other events at various destinations around the country.
You can follow along the race since it started this past weekend as they post to their blog on sooper.us. Live updates are posted from the road via their Blackberry. You can also view photos on their Flikr photostream, and they will eventually have videos posted of their track racing as well. You might be able to read about them in Car and Driver in a few months but it is much more fun to follow along live!

They are also carrying the famous Quack Quack Jack duck, in memory of Ed Smith/MaxaMini. It had just finished a tour of many MINI friends in Europe and was quickly shipped over to join Sooper in OneLap. You can follow QQJ’s travels on this MINI2 thread.

This is also a good opportunity to mention another local MINI friend, Pete Basiliere, who just opened a new local MINI parts store and tuning shop, Oxford Motorsports. Pete is sponsoring a big part of Dave & Joe’s One Lap race.

Joe, Dave, and Sooper are facing some stiff competition, include two other MINIs, so wish them luck!

April 29, 2006

The Trim Test

Filed under: — Josh Wardell @ 11:50 pm

I have a long list of car cleaning products to keep my MINI detailed in the summer, but there is one thing that I can’t seem to keep looking good: the plastic fender trim. After about a year, the trim starts looking worse and worse, holding dirt and wax residue in its texture. I have tried a number of products to keep it looking good but they never seem to last more than a few days. The forums have even had long discussions such as this one on NAM on products to use but don’t really come to a great conclusion.

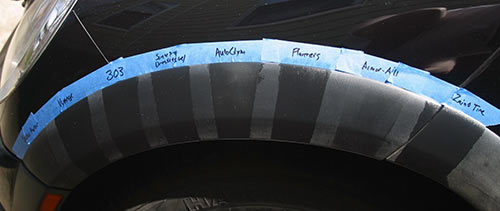
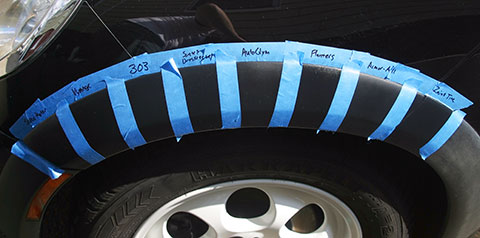
So I decided to take things into my own hands and rounded up all my trim cleaning products, including some new ones I picked up over the winter, and applied them next to each other. The goal of this test is not to see how they look immediately after applying, but how long they last, and their resistance to rain. So after a wash, I taped off eight sections of a fender, and applied each product. (click photos for larger)

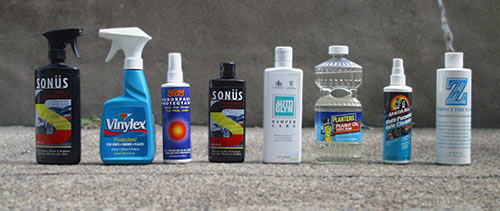
The products applied, in order, are:
Sonus Trim & Motor Kote
Vinylex
Aerospace 303 Protectant
Sonus Tire & Bumper Dressing Gel
AutoGlym Bumper Care
Planters Peanut Oil
Armor-All Protectant
Zaino Z16 Perfect Tire Gloss

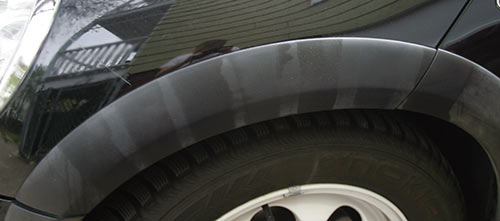
Then after a few days (mostly sunny, with one short drizzle), I took this photo:

The Motor Kote and Armor-All were nonexistant. The AutoGlym did not look so good, some areas seemed even whiter than normal. The peanut oil was covered in dust and dirt that stuck to its oily surface. Vinylex ran a little in the drizzle but looked pretty good. The 303 looked almost as good as the best two, the Sonus and Zaino.

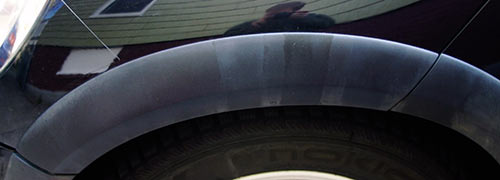
But then the true test: We had two days with plenty of rain. Though it never rained hard, nor did I drive in much more than a drizzle, clearly it was enough:

Except for the vertical edge, all products were almost completely washed off, except for the peanut oil. Clearly, everything else is water based.

But I don’t want to say the peanut oil is the winner. It is a mess to apply. The plastic looks way too oily. And it attracts dirt. So, sadly I’m going to have to try even more products. If you know of others, especially any that can survive the rain, please mention them and I may try them in the future.

April 17, 2006

Spring Cleaning, Part I

Filed under: — Josh Wardell @ 11:22 am

Spring has finally arrived in New England and so begins my several-week process of cleaning the car and detailing it to its super clean summer condition. The first step is to wash the car, of course. Afterwards I fill in the hundreds of paint chips and scratches that accumulated over the last year with touch-up paint. If you’ve used the standard paint in a white out-like bottle, you know it is impossible to apply a small enough amount with the brush in the cap.

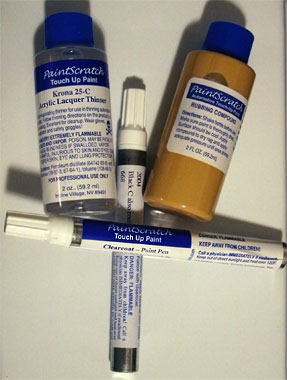
Last winter I found a company online that makes touch-up paint in all colors in the form of a paint pen. PaintScratch has an easy to use web site that allows you to pick your specific color and place an order. The pens are similar to Sharpies but use real automotive paint. And like real paint you have a pen for the base color and another for the clearcoat. Because they have a nice beveled tip you can easily apply just the corner into a thin scratch, and paint will not blob in holes from chips.

This is where I stop for the week, because I like to give the paint a week to cure before any wax or polish is applied to it. So in a week or two will be the true detailing process that often takes me six hours, including polish, claybar, and the initial several layers of Zaino.

I have also begun another comparison test, this time of all the products I have for cleaning up the textured black plastic fender trim. It looks great when new, but over time the plastic loses its oils and the texture holds in dirt and wax residue. NAM has had a good discussion on the topic. Most products I’ve used don’t last much longer than a week, so I have some new ones along with the previous products (and of course the popular home remedy, Planter’s Peanut Oil!) and we’ll see in a few weeks which one wins.

Additionally, I have updated my car care page with some of the new products I am using this year, as well as fixed some outdated links. Remember that page for quick reference of all the cleaning products I currently use.

« Newer PostsOlder Posts »

Powered by WordPress